The other day I was (,as usual ,) facebooking, when I encountered this image, with the tagline
god shiv in himalyas....... Share it u will be lucky for whole year... :)
Blistering Barnacles! Ten thousand thundering typhoons! Isn't this insanity? I agree that the whole country is very religious, but I wonder who is the person playing with the sentiments of the 1.5 lakh people who 'liked' the post and the 2.5 lakh who shared it! Had I encountered this image 5 years ago, I'd have been shocked to see it (Hell, for a second, I thought it was real, in spite of the fact that I could actually do it!), but I decided to come up with something of my own to prove the people who were bewildered by this image!
This was the resulting image that I came up with. This was a 5 minute job for me and a good answer to the guy who had come up with that image! However, I was still not happy. I wanted to do something more. So, I decided to tell you how to do it yourself and put yourself, a friend or anyone (or anything else) up there in the sky!
Here is a simple way in Photoshop on how you can do it on your own!
(The stock images I used in this demonstration can be found here : http://www.mediafire.com/download.php?9unszj82pc876jl)
1. The first step is to load the original image and then, the second one on top of it (best way is to drag and drop.) I chose Jack Sparrow for obvious reasons. Err... Captain Jack Sparrow. I chose the cloud on the left of the background to put him. So, I resized the image to a size which would look just suitable.
2. Use a suitable tool to cut out the figure you want to put. Here I have used the pen tool. You might also use the quick selection tool, or the magic lasso tool. Remove the rest of the background of the second image.
3. Select the could through a suitable tool (here, I used the quick selection tool). Then press Ctrl+Shift+I to select the inverse. The purpose of this will be explained in the next step.
4. Move the second image to a place away from your target area, and select the clone stamp tool (with hardness '0'). Alt click on the original man to select the area from which to clone and then start painting over the cloud (in a new layer, let's call that Layer 1). The selection in the previous step ensures that the figure appears to come from behind the cloud.
5. Delete the layer that contains the original Jack Sparrow. Then, duplicate the layer which contains the new Jack Sparrow (let's call that Layer 1 copy). Apply a Gaussian Blur (Filter-Blur-Gaussian Blur) of about 60 px to Layer 1 copy, and put in below Layer 1. Then, merge the two layers into the same (Layer 1).
6. Reduce the Opacity of Layer 1 to about 20%. You might change the value to anything that suits your image. Now, merge all the layers into the background.
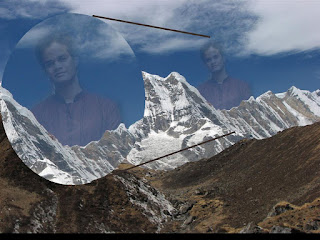
7. Select the elliptical area as shown, and create a layer via copy.
8. Once the new Layer is selected, press Ctrl + T to transform it, and then increase the size so as to highlight the figure coming out of the blue. Position it appropriately.
9. Create two lines to emphasize the part you have zoomed.
Viola! You have just created Captain (now Lord,) Jack Sparrow! Oh, Johnny Depp would be so proud!

 This was the resulting image that I came up with. This was a 5 minute job for me and a good answer to the guy who had come up with that image! However, I was still not happy. I wanted to do something more. So, I decided to tell you how to do it yourself and put yourself, a friend or anyone (or anything else) up there in the sky!


0 responses:
Post a Comment